
Dear friend , Today I want to walk you through my favorite way to sketch jellyfish from start to finish. I’ve been teaching people how to draw for years, and jellyfish are always one of the most popular subjects. Why? Because they’re beautiful, calming to draw, and surprisingly easy once you know the basic steps!
Let me share the exact process I use every single time I sketch a jellyfish. By the end of this guide, you’ll have all the skills you need to create your own amazing jellyfish drawings.
Watch this helpful tutorial as we go through the steps:
This detailed 11-minute tutorial by Titatu Pencil shows excellent pencil techniques for realistic jellyfish drawing.
Getting Your Materials Ready
First things first – let’s talk about what you’ll need. I keep my jellyfish sketching simple because I want to focus on the drawing, not worry about lots of fancy tools. Here’s what I always have ready:
A regular pencil works great, but I prefer a 2B pencil because it gives me nice, smooth lines that aren’t too light or too dark. You’ll also want a good eraser – I love kneaded erasers because they don’t leave crumbs all over my paper. For paper, any sketch pad or even regular printer paper works fine when you’re starting out.
I also like to have some blending tools handy. You can use your finger, a tissue, or a special blending stump. These help create those soft, glowing effects that make jellyfish look so magical and alive.
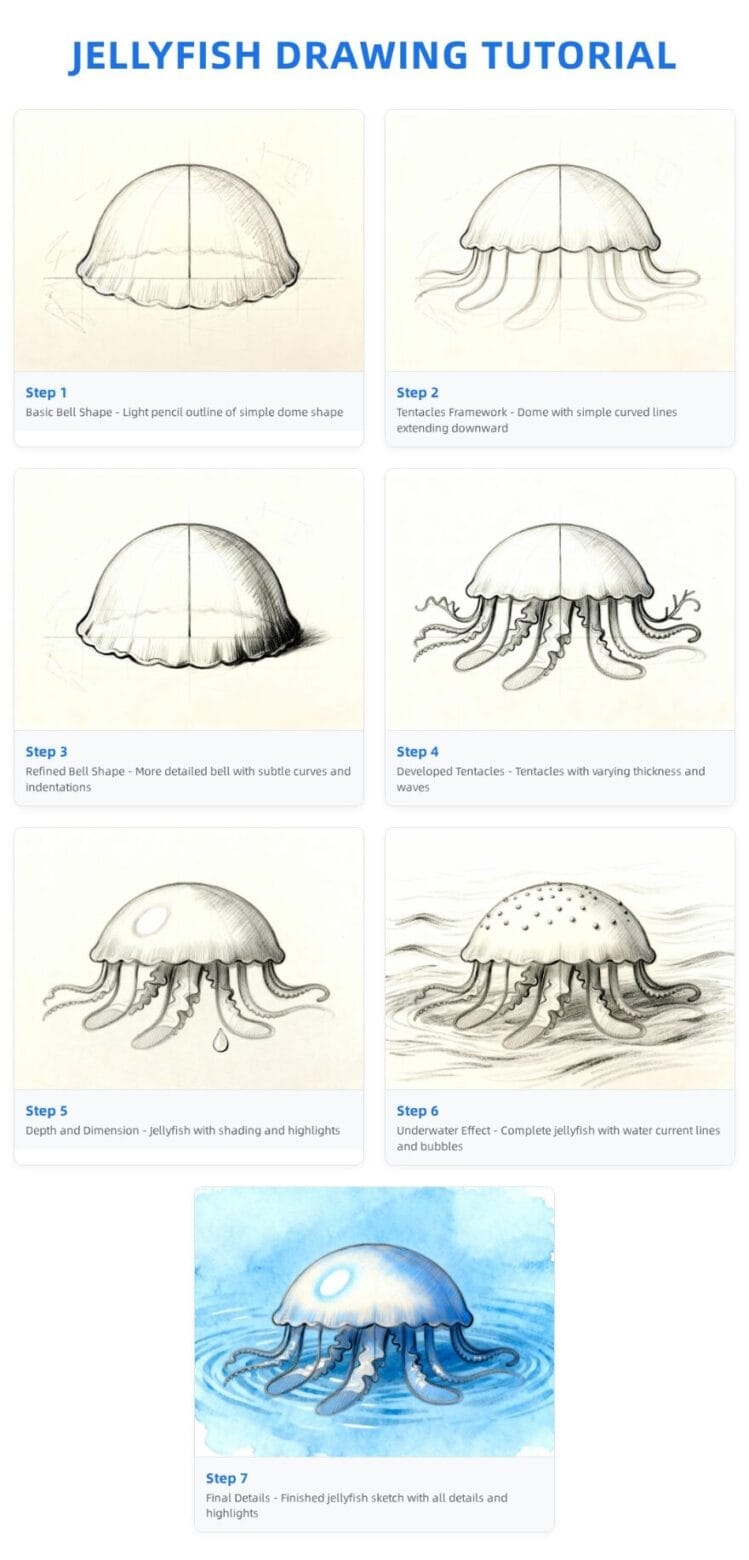
Step 1: Start with the Basic Bell Shape
Here’s where everyone starts, and it’s easier than you think! I begin by drawing a simple dome shape – imagine you’re drawing the top half of a circle, but make it a bit more oval and stretched out.
The key is to start light. I barely press my pencil to the paper for this first outline. Why? Because I’m going to refine this shape as I go, and I don’t want heavy lines that are hard to erase later.
I make my dome a bit wider than it is tall – this gives the jellyfish that classic, graceful look. Don’t worry if it’s not perfect! Real jellyfish aren’t perfectly symmetrical either. In fact, a little wobble in your lines can make your drawing look more natural and alive.
Step 2: Add the Tentacles Framework
Now comes the fun part – adding the flowing tentacles! I start by drawing simple, curved lines that flow down from the bottom edge of the bell. Think of these as the “skeleton” of your tentacles – you’ll add more detail later.
I usually draw between four to eight main tentacles, and I make them different lengths. Some might go all the way to the bottom of my paper, while others are shorter. This creates visual interest and makes the jellyfish look like it’s really moving through water.
Here’s a tip I learned from years of drawing: make your tentacles curve in different directions. Some should curve left, some right, and some might even loop back on themselves. This gives your jellyfish that beautiful, flowing underwater dance look.
Step 3: Refine the Bell Shape
Time to go back to that dome shape and make it more interesting! Real jellyfish bells aren’t just simple domes – they have subtle curves and indentations that make them look alive.
I add gentle curves around the edges of the bell, making some areas poke out a little and others curve inward slightly. This creates that soft, pulsing look that jellyfish have when they swim. I also like to add a few light lines inside the bell to suggest the jellyfish’s inner structure.
Don’t go overboard with details here – jellyfish are beautiful because they’re simple and elegant. A few well-placed curves will do the trick perfectly.
Step 4: Develop the Tentacles
Now I go back to those simple tentacle lines and bring them to life! I make some tentacles thicker and others thinner. Real jellyfish have different types of tentacles – some are thick and ribbon-like, others are thin and thread-like.
I add gentle waves along the length of each tentacle. The secret is to vary these waves – don’t make them all the same size or spacing. Some parts of a tentacle might have tight little ripples, while other parts have big, sweeping curves.
I also add some branching tentacles – smaller threads that split off from the main ones. This adds complexity and makes your jellyfish look more realistic and detailed.
Step 5: Create Depth and Dimension
This is where your jellyfish really starts to come alive! I use shading to make the bell look three-dimensional instead of flat. I imagine light coming from above (like sunlight filtering down through water) and add shadows accordingly.
The top of the bell gets the lightest shading, while the underneath gets darker shadows. I use my pencil to create gentle gradients – darker in some spots, lighter in others. This curved shading is what makes the bell look round and full instead of flat.
For the tentacles, I add shadows on one side of each one. This makes them look like they have volume and are floating freely in the water instead of just lying flat on the paper.
Step 6: Add the Underwater Effect
Here’s where I add that magical underwater feeling! I create soft, wavy lines around the jellyfish to suggest water currents and movement. These don’t need to be perfect – just gentle, flowing lines that make it look like your jellyfish is floating in water.
I also add some small bubbles here and there. Just tiny circles scattered around the jellyfish make it feel like it’s really underwater. Some bubbles can be floating up toward the surface, while others might be caught in the tentacle flow.
Step 7: Final Details and Highlights
The final step is adding those special touches that make your jellyfish drawing really shine! I use my eraser to create highlights on the bell – areas where light would reflect off the jellyfish’s translucent body.
I also clean up any smudges and make sure my lines flow smoothly. Sometimes I’ll darken certain lines to make them stand out more, or lighten others so they blend softly into the background.
For a final magical touch, I might add some very light shading around the entire jellyfish to create a subtle glow effect. This makes it look like the jellyfish is bioluminescent – glowing with its own inner light!
Common Mistakes I See (And How to Avoid Them)
After teaching hundreds of people to draw jellyfish, I’ve noticed some common mistakes that are easy to fix. The biggest one is making the tentacles too stiff and straight. Remember – these are flowing, flexible appendages moving through water! Keep your lines curvy and organic.
Another mistake is making the bell too perfect and round. Real jellyfish bells have character – they’re a bit lumpy and irregular, and that’s what makes them beautiful!
Also, don’t be afraid of your eraser! I use mine constantly while drawing, not just to fix mistakes but to create highlights and soften lines. It’s just as important as your pencil.
Practice Makes Progress
The best advice I can give you is to practice regularly, but don’t put pressure on yourself to create masterpieces every time. Some of my favorite jellyfish sketches are quick, loose drawings I did while relaxing.
Try sketching jellyfish in different positions – some from the side, some from below looking up at their bells. Each angle teaches you something new about their form and helps you become a better artist.
Remember, every professional artist started exactly where you are now. The only difference between a beginner and an expert is the number of hours spent practicing. So be patient with yourself, enjoy the process, and celebrate every small improvement you make!
Drawing jellyfish has brought me so much joy over the years. There’s something incredibly peaceful about sketching these graceful creatures. I hope this step-by-step guide helps you discover that same joy in your own artistic journey!

A Teacher with 5 years of experience. Our Expertise, is reliable to meet your full Academic development needs . Worked on many crafts and construction projects offering services from design to development to deployment over the years. You will find many of my works in my business portfolio on request.