If you’ve never painted on canvas before, don’t worry. Jellyfish are actually perfect for beginners because they’re forgiving, beautiful, and so much fun to create. Learn How to start Painting Jellyfish on Canvas for Beginners
I remember my first jellyfish painting. I was nervous about using “real” paints on a “real” canvas, but by the end of that session, I was completely hooked. There’s something magical about watching a jellyfish come to life under your brush, and I can’t wait to help you experience that same excitement!
But honestly, the main reason I love painting jellyfish is because they’re just plain beautiful. Every time I finish a jellyfish painting, I feel like I’ve captured a little piece of ocean magic on my canvas.
Gathering Your Painting Supplies
Let’s start with what you’ll need. I always tell my students that you don’t need expensive supplies to create beautiful art, especially when you’re starting out. Here’s my basic jellyfish painting kit:
For paints, I use acrylics because they’re beginner-friendly, dry quickly, and clean up easily with water. You’ll want white, blue (I prefer ultramarine), purple, maybe a touch of pink or yellow, and black. That’s it! These few colors can create amazing jellyfish paintings.
I use a small canvas – usually 8×10 inches or even smaller when I’m starting a new technique. For brushes, grab a few different sizes: a larger flat brush for backgrounds, a medium round brush for the jellyfish body, and a small detail brush for tentacles and fine work.
Don’t forget water containers (I use two – one for cleaning, one for clean water), paper towels, and a palette for mixing colors. A disposable paper plate works great as a palette when you’re beginning!
Setting Up Your Workspace
I’ve learned that a good setup makes painting so much more enjoyable. I like to paint near a window for natural light, but any well-lit space works fine. Cover your work surface with newspaper or plastic – trust me on this one! Acrylic paint can be messy, especially when you’re learning.
I always have my reference images ready too. Whether it’s photos from the internet or pictures I’ve taken at aquariums, having visual references helps so much when you’re learning to paint jellyfish.
Step 1: Creating the Underwater Background
We’re going to start with the background, and this is where the magic begins! I mix different shades of blue and purple to create that deep ocean feeling. The trick is to not make it one flat color – real underwater scenes have depth and movement.
I start with my larger brush and paint the entire canvas with a medium blue. While that’s still wet, I add darker blue in some areas and lighter blue in others. I blend these together with long, sweeping brush strokes that suggest the movement of water.
Here’s something I learned from years of painting: don’t overthink this part! The background should feel loose and flowing, just like water. If you make it too perfect, it won’t look natural.
Step 2: Planning Your Jellyfish Placement
Before I start painting the actual jellyfish, I take a moment to plan where it’s going to go on my canvas. I usually place my jellyfish slightly off-center – this creates a more interesting composition than putting it right in the middle.
I lightly sketch the basic shape with a pencil or even just visualize it in my mind. The jellyfish bell will be in the upper portion of the canvas, with the tentacles flowing down toward the bottom.
Step 3: Painting the Jellyfish Bell
Now for the exciting part – painting the jellyfish itself! I start with the bell, which is the dome-shaped top part. I mix white with just a tiny bit of blue or purple to create a translucent color that’s not pure white but not quite gray either.
Using my medium round brush, I paint the bell shape with smooth, curved strokes. I don’t worry about making it perfectly symmetrical – real jellyfish aren’t perfect, and that’s part of their charm!
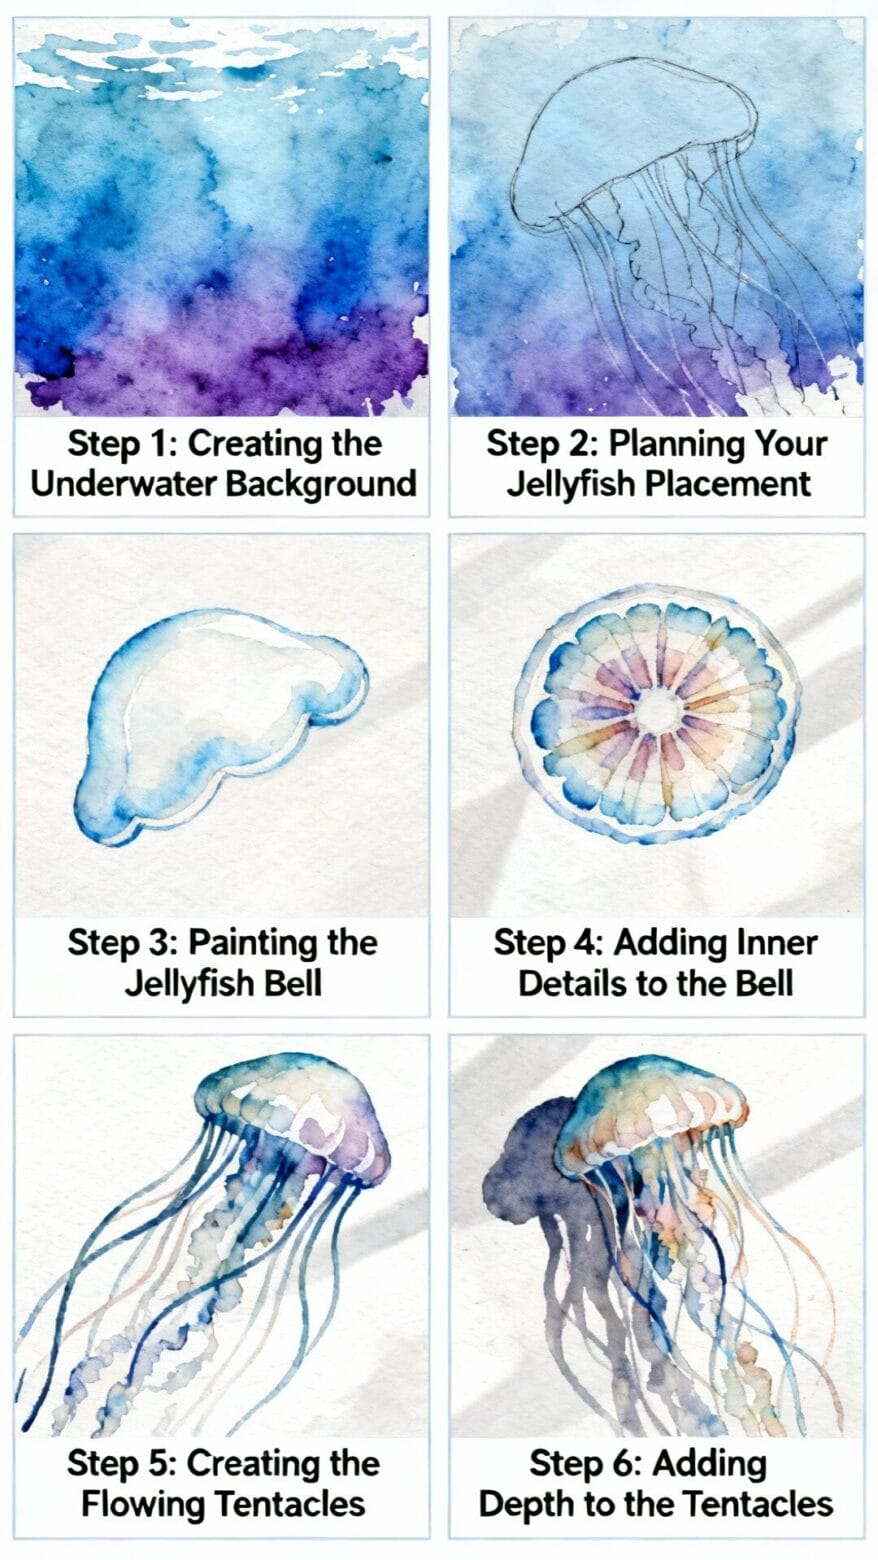
While the paint is still wet, I add some darker areas around the edges and underneath the bell. This creates that translucent, three-dimensional look. I blend these colors gently with my brush, creating soft gradients that make the bell look like it’s really floating in water.
Step 4: Adding Inner Details to the Bell
Real jellyfish have beautiful internal structures that you can often see through their translucent bodies. I love adding these details because they make the painting look more realistic and interesting.
Using a slightly darker version of my bell color, I paint some gentle curved lines inside the bell shape. These represent the jellyfish’s internal organs and radial canals. I keep these lines soft and subtle – they should enhance the jellyfish, not overpower it.
Sometimes I add a few small dots or circular shapes in the center of the bell. These can represent the jellyfish’s reproductive organs or just add visual interest to the painting.
Step 5: Creating the Flowing Tentacles
This is my absolute favorite part of painting jellyfish – the tentacles! They’re where you can really let your brush flow and create those beautiful, organic shapes that make jellyfish so mesmerizing.
I use my small detail brush and start with the same translucent color I used for the bell. I paint long, flowing lines that curve and wave as they extend down from the bell. The key is to vary the pressure on your brush – press harder for thicker parts of tentacles, lighter for thin, delicate areas.
I make some tentacles longer than others, and I have them flowing in different directions. Some might curve to the left, others to the right, and some might even loop back on themselves. This creates that natural, underwater movement.
Step 6: Adding Depth to the Tentacles
To make the tentacles look three-dimensional instead of flat, I add shading and highlights. I imagine light coming from above (like sunlight filtering down through the ocean) and paint accordingly.
I add darker color along one edge of each tentacle to create shadows, then use a clean, damp brush to blend these shadows softly into the main tentacle color. This simple technique makes the tentacles look round and full of life.
For highlights, I sometimes add thin lines of lighter color along the opposite edge from the shadows. This creates the illusion of light reflecting off the tentacles’ surface.
Step 7: Creating the Magical Glow Effect
Many jellyfish are bioluminescent – they create their own light! This is where you can really make your painting special and magical. I love adding a subtle glow around the entire jellyfish.
Using a clean, soft brush, I blend a very light color (usually white mixed with a tiny bit of blue or purple) around the edges of the jellyfish. I keep this very subtle – just enough to suggest that inner glow without making it look cartoonish.
Sometimes I also add a few small dots of bright color scattered around the jellyfish to represent bioluminescent sparkles. These tiny details can really make your painting come alive!
Step 8: Final Details and Water Effects
For the finishing touches, I add some water effects around the jellyfish. I paint some subtle wavy lines to suggest water currents and movement. These should be very light and soft – just enough to enhance the underwater feeling.
I might also add a few small bubbles here and there. Just tiny circles scattered around the painting can really enhance that underwater atmosphere.
Common Beginner Challenges (And How I Handle Them)
After teaching many people to paint jellyfish, I’ve noticed some common challenges that beginners face. The biggest one is fear of making mistakes. I always tell my students: there are no mistakes in jellyfish painting, only happy accidents! If a tentacle goes in an unexpected direction, just go with it – it often creates beautiful, natural-looking movement.
Another challenge is getting the colors right. Remember that jellyfish are translucent, so they’re never solid, opaque colors. Always mix your colors with white to create those beautiful, see-through effects.
Also, don’t be afraid to blend colors while they’re wet. Acrylic paint dries quickly, so work confidently and blend colors while you have the chance.
Building Your Confidence
The best advice I can give you is to start simple and build your skills gradually. Your first jellyfish painting might not look exactly like you imagined, and that’s perfectly okay! Every painting teaches you something new.
I recommend painting multiple jellyfish – try different colors, different sizes, different tentacle arrangements. Each one will be unique, and you’ll learn something new with every painting.
Also, don’t compare your work to others. Every artist has their own style and their own journey. Focus on enjoying the process and celebrating your own progress, no matter how small it might seem.
The Joy of Jellyfish Painting
Painting jellyfish has brought me countless hours of joy and relaxation. There’s something incredibly meditative about the flowing brush strokes and the gentle blending of colors. Every time I paint a jellyfish, I feel like I’m creating a little window into an underwater world.
I hope this guide helps you discover that same joy. Remember, the most important thing is to have fun and enjoy the creative process. Your jellyfish paintings will be unique expressions of your own artistic voice, and that’s what makes them special!
So grab your brushes, squeeze out those paints, and let’s bring some jellyfish magic to life on canvas together!

A Teacher with 5 years of experience. Our Expertise, is reliable to meet your full Academic development needs . Worked on many crafts and construction projects offering services from design to development to deployment over the years. You will find many of my works in my business portfolio on request.