Drawing a girl’s face doesn’t have to feel scary—once you use a simple plan, it starts clicking fast.
You’ll learn an easy, step-by-step method that helps you place eyes, nose, mouth, and hair without guessing.
I’ll show you construction lines that you can keep or erase as you go, so your drawing stays flexible.
This is perfect for beginners, kids, and anyone who wants a smooth “from sketch to finished face” process.
If you want faster progress, you’ll also get simple practice strategies and proportion tips you can reuse on any portrait.
Key Takeaways
Start with a light construction sketch: circle → softer female head shape.
Use a hairline guideline early and keep it as an “anchor” throughout the drawing.
Place features by landmarks (eyes, nose, mouth) before adding details.
Use the “five eyes” proportion to help space the eyes correctly.
Draw facial features as recognizable simple shapes first, then refine.
Build hair on top of the head shape, using the hairline to guide placement.
Practice by redrawing the same face and changing one thing at a time (angle, hair, expression).
Quick Answer
To draw a girl’s face easily, I start with a circle, soften the sides to form a female head shape, and add light guidelines for the hairline and features. Then I locate the eye line, use the “five eyes” spacing to place the eyes, add the nose and mouth relative to those landmarks, refine the head contour, and finally build the hair over the head using the hairline as a guide.
What You Need
Item
Purpose
Notes
Pencil (HB or 2B)
Light construction sketching
Use lighter pressure so you can erase easily
Eraser
Fix mistakes without stress
A kneaded eraser is great for soft lines
Sketch paper or sketchbook
Drawing surface
Any paper works—just be consistent
Optional: ruler
Straight guideline lines
Helps for the eye line and placement
Optional: reference photo or mirror
Helps you see accurate proportions
Choose a front or 3/4 view first
Optional: digital drawing app + stylus
Make edits easier
Digital lets you undo imperfect strokes
Black pen/fineliner (optional)
Final clean lines
Only after the sketch looks right
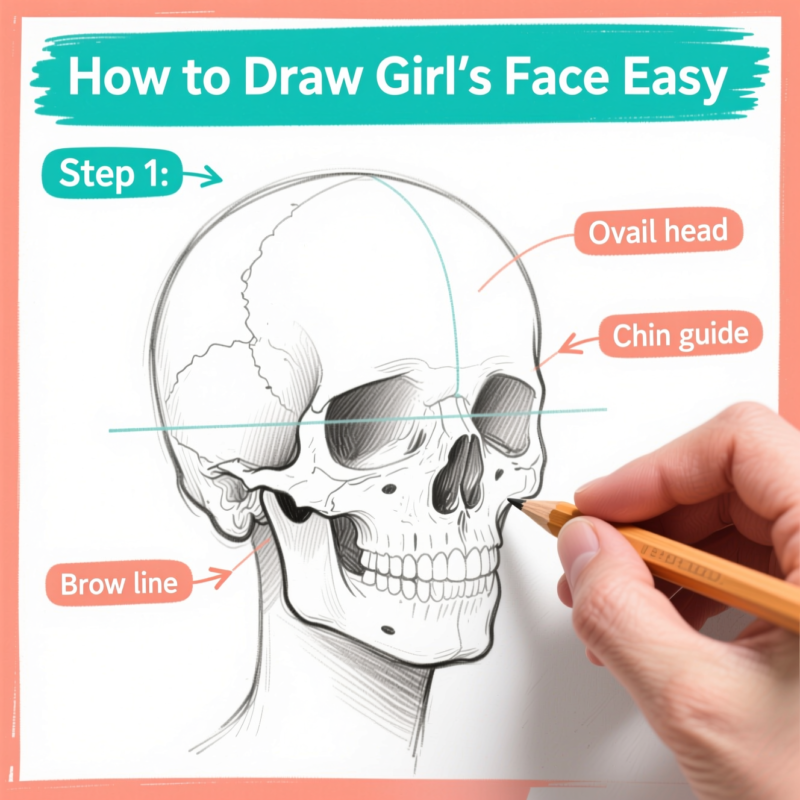
Step 1: Build a Simple Head Construction
I always start with a basic construction shape because it removes a lot of pressure. If you try to draw a “pretty face” straight away, you’ll probably feel stuck. Instead, I draw the head like it’s a model.
Draw a circle (lightly).
– Think of it as the “container” for the face.
Create a softer jaw by cutting off the sides slightly.
– For a female face, I keep the shape less angular than a typical male jaw.
Add a very faint vertical center line and a horizontal guideline (lightly).
– This helps me keep both sides balanced while I place features.
Tip: Don’t press too hard. I want these lines to be easy to erase or adjust later. If you’re digital, light sketching is even better because you can refine without fear.
Step 2: Place Landmarks with Guidelines
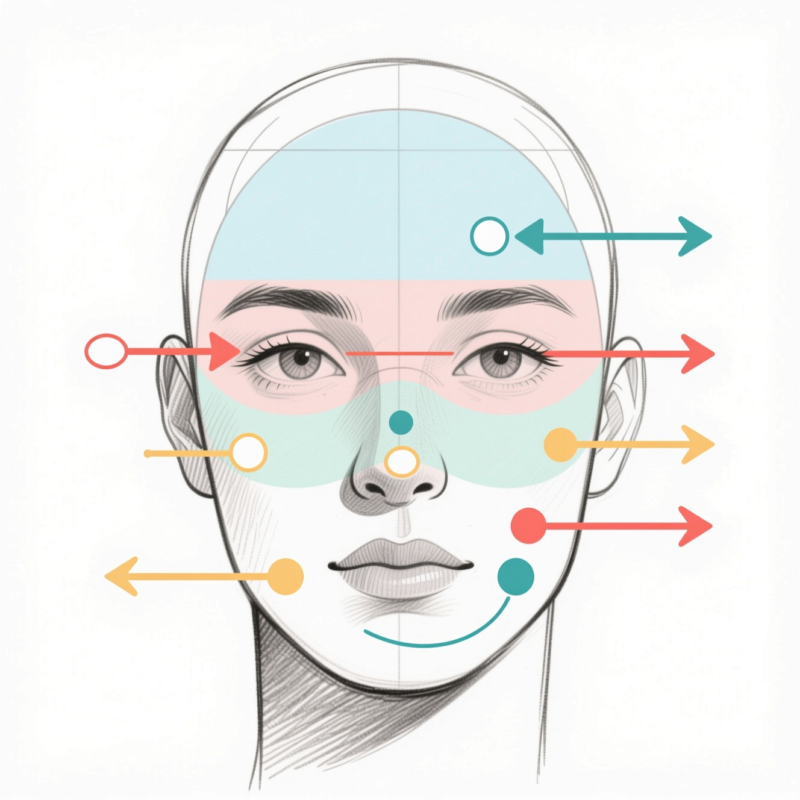
Now I focus on where the main features go. I don’t start with eyelashes or tiny details yet. I place the big points first: hairline, eyes, nose, and mouth.
Add a hairline guideline.
– I place it before I do much else and keep it through the drawing.
– It’s a simple anchor that tells me where hair starts on the forehead.
Locate the eye line and mark it lightly.
– This is where the top/middle area of the eyes will sit.
Lightly mark where the nose and mouth will be.
– I keep these marks small and vague—just landmarks.
When I’m confident about these positions, I remove some extra guidelines (but not the hairline). Keeping the hairline is helpful because it connects the head shape and the hair placement.
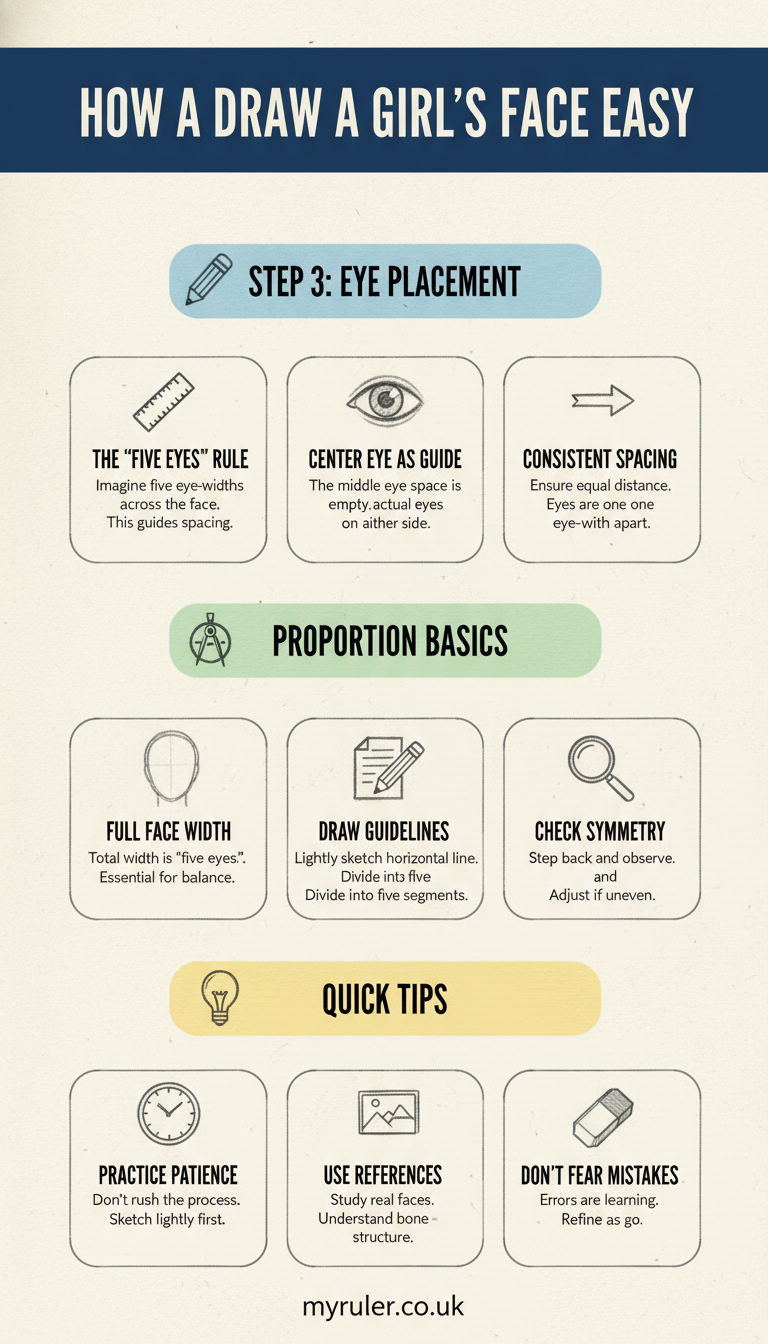
Step 3: Use the “Five Eyes” Proportion for Eye Placement
This is the part that makes the drawing look more “right” quickly.
Most faces can be measured using a simple guideline: the face width is often about “five eye widths” across (even though we only draw two eyes). Here’s how I use it without getting complicated.
Use your eye line (from Step 2).
Sketch five light ovals across that line.
– Each oval represents an “eye-width.”
Place the actual left and right eyes where the middle three ovals guide spacing.
– The two eyes typically take up the center area, with the outside space controlled by those ovals.
I keep the guides light. Once the eye placement feels correct, I draw the eyes over the guides using simple shapes (not details yet).
Pro tip: If one eye looks higher or wider than the other, it’s usually a placement issue. I check alignment with the center line and the eye line first—then I refine.
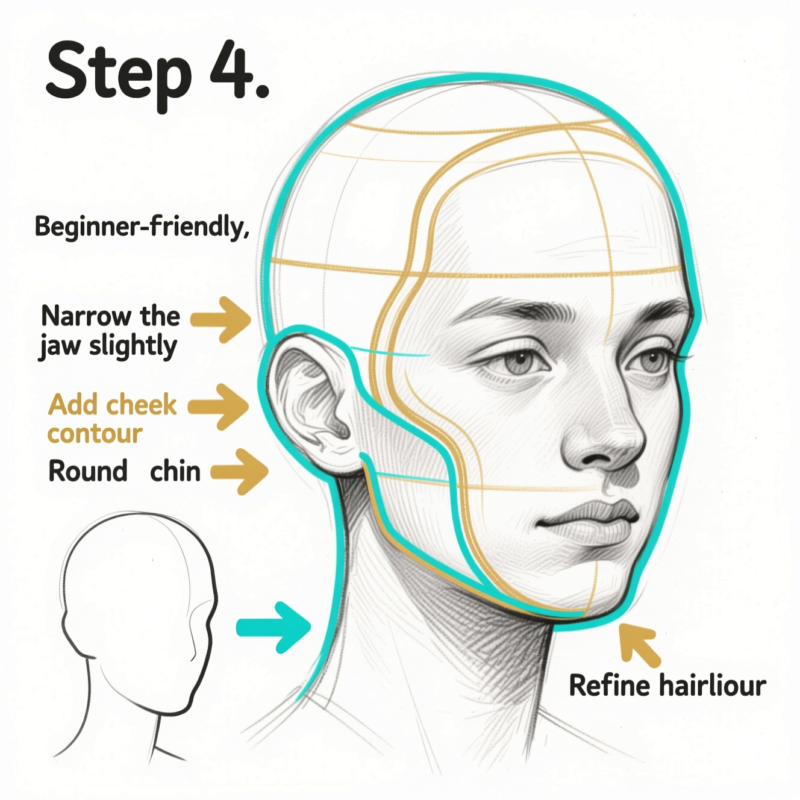
Step Step 4: Shape the Head and Contour
At this point, I have landmarks. Now I refine the face shape to fit the likeness I want.
Rework the outline of the head.
– I connect the jaw, cheek, and forehead smoothly.
– Female faces often feel softer—less harsh in the jaw and cheekbone areas.
Use the hairline guideline to shape the forehead-to-hair area.
– This helps me avoid the common mistake of placing hair too high or too low.
Adjust cheek and jaw contours.
– If the face looks too round, I slightly narrow the jaw or add gentle cheek definition.
– If it looks too sharp, I soften the jaw corners more.
This is where the drawing starts looking like a real person instead of a “head shape with eyes.” I focus on contour and silhouette—the overall outline—because that’s what catches the eye.
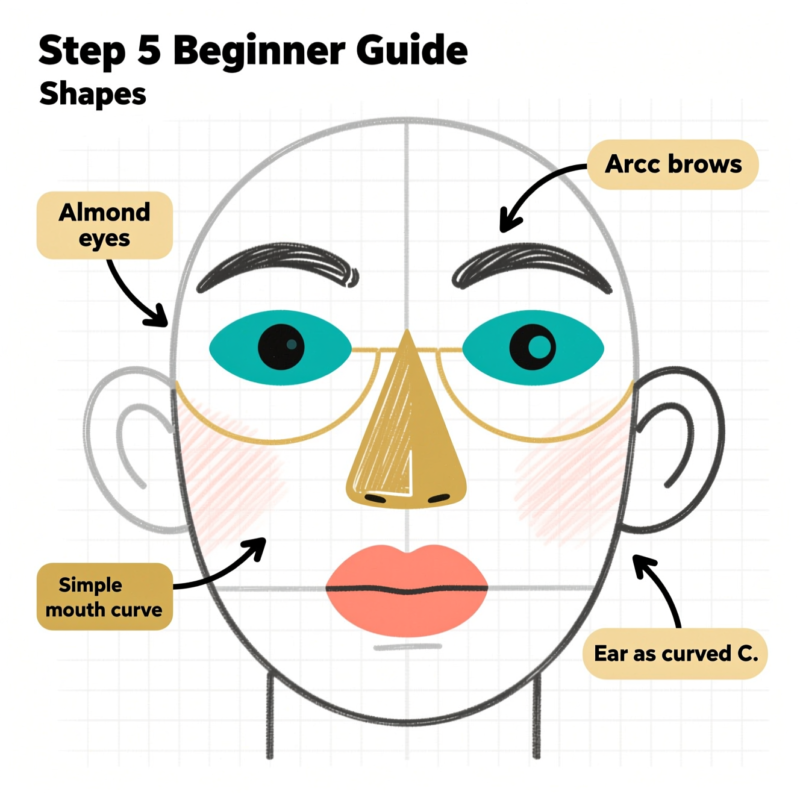
Step Step 5: Draw Facial Features from Recognizable Shapes
Now I add details, but I still use easy building blocks. Think of each feature as a set of simple shapes first. That way, you’re not forced to draw everything perfectly from the start.
Eyes
Draw the upper and lower eyelids using the eye placement guides.
Add the iris and pupil.
– I keep the iris size consistent across both eyes.
Add eyebrows lightly.
– Brows can change the whole expression, so I place them after the eyes feel right.
Nose
Start with a simplified nose shape.
– I think of it like a small bridge and a rounded tip.
Place nostrils gently.
– If you overwork the nostrils early, the nose can look heavy or weird.
Refine slowly.
– I check the nose alignment against the eyes using the landmarks.
Remember: noses are complex. If yours doesn’t look “accurate” right away, that’s normal. Keep practicing. Even stepping through simplified forms improves your results fast.
Mouth
Place the mouth based on the eye and nose landmarks.
Sketch the upper lip and lower lip with simple curves.
– I usually keep the lips a bit softer and smaller for a younger or more feminine look, but it’s really about expression and proportions.
Add a tiny smile line (optional).
– A subtle curve makes a big difference.
Ears (if visible)
If you can see the ear in your reference, I treat it as a recognizable “sub-shape,” not a random blob.
I block in the outer ear shape first.
Then I refine inside curves and plan shadows where the ear bends (like around the tragus and internal notches).
This approach helps the ear look placed and realistic instead of floating.
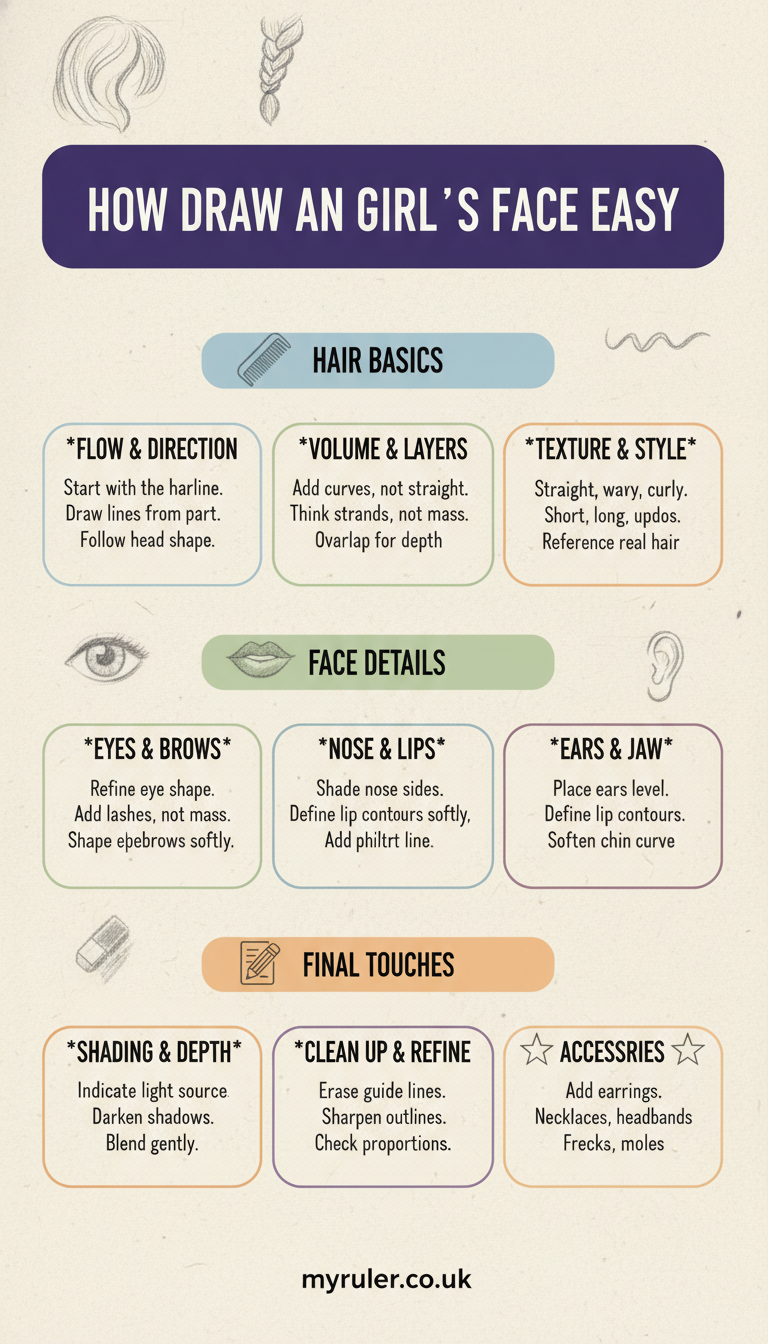
Step Step 6: Add Hair and Finish the Face
Now I use the hairline guideline to make the hair placement feel natural. Hair is easier when you build it on top of a head shape instead of drawing random strands.
Use the hairline guideline to determine where hair starts.
– I mark the hairline edge before I draw any long hair strands.
Build the hair around the head silhouette.
– I draw the overall hair mass first (like a “cap” or shape).
Add volume with simple shapes before adding detail.
– For example, I add a thicker section around the crown and soften it toward the sides.
Clean up the sketch.
– I erase or reduce the construction lines that distract from the face.
Finalize facial details.
– I add final eyelashes, eyebrow clarity, and lip edges last.
Digital note: if your line doesn’t look right, you can usually undo it or refine it. That makes hair-building less stressful.
Traditional note: if your lines are too dark, it can be harder to erase. I go light early, dark only when I’m sure.
Practice Plan (Make It Easy Through Repetition)
The fastest way to draw a girl’s face “easy” is repetition with smart variation. I don’t just redraw the same face 20 times with no plan. I practice in a way that teaches my brain what matters.
1) Draw from different angles
Start with:
Front view
Slight 3/4 view (turning your head a little)
Then try more complex angles later
Each angle changes proportions, so you’ll get better general results.
2) Use a feature reference sheet
I keep a small reference sheet for noses, mouths, and eye shapes. It helps me remember how the forms connect.
When you practice features individually, you build confidence faster.
Then when you combine them into a face, it feels less overwhelming.
3) Redraw the same face, changing one variable at a time
This is my favorite beginner method. I pick one face photo and do multiple versions:
Version A: same angle, different hairstyle
Version B: same hairstyle, different expression (neutral vs smile)
Version C: same face, different light angle (if the reference changes)
Changing one variable at a time prevents you from getting lost.
4) Practice with light construction first
Every time I feel stuck, I go back to the basics:
circle
softened head shape
landmarks
eye spacing
feature shapes
This saves me from jumping ahead and messing up proportions.
Tips
Keep your construction lines lighter than your final lines. This makes your face look cleaner.
Don’t remove your hairline guideline too early—use it as a “map” for hair placement.
Use a reference photo or mirror, especially at the beginning. Your eyes need something to measure.
Focus on symmetry after you place landmarks. Details can come later.
If one feature looks off, check the landmarks first (eye line, center line, hairline).
Try drawing the face in under 15 minutes. Speed forces you to use simple shapes instead of overthinking.
FAQ
What if my eyes look too far apart or too close?
I check the eye spacing using the “five eyes” guide. If the eyes still feel off, I compare them to your center line and eye line first. Then I adjust by moving the entire eye shapes slightly rather than stretching one tiny detail.
How do I make the face look more feminine?
I focus on softer head contours:
gentler jaw shape
slightly smoother cheek-to-jaw transitions
and hair placement that follows the hairline naturally
Also, subtle differences in eyebrows, eyelashes, and lip shape can change the overall vibe a lot.
Do I have to draw the “circle” step?
Yes—at least at first. The circle gives you a consistent base, and it prevents the face from shrinking or stretching accidentally as you add details. Once you’re comfortable, you can simplify the construction, but beginners will benefit from keeping it.
Should I draw every detail the first time?
No. I aim for a “good structure” first. I use simple forms to place eyes, nose, and mouth, then refine only after the layout looks correct.
What’s the easiest hairstyle to draw?
Start with a hairstyle that has a clear hair mass shape:
straight hair with a clear outline
a simple bob
hair tied back (like a bun or ponytail) can also be easier because it creates a strong silhouette
Complex curly hair can come later.
Conclusion
If you want to draw a girl’s face easy, the secret is not “perfect talent”—it’s a simple process. I start with a construction head (circle + softer jaw), place landmarks with a hairline guideline, use the “five eyes” proportion to position the eyes, and then build features as recognizable shapes. After that, I add hair by working from the head silhouette and letting the hairline guide everything.
Keep practicing with references, redraw the same face a few times while changing one thing at a time, and you’ll notice your drawings getting better much faster than you expect. You’ve got this—grab your pencil and try your first easy face sketch today.
A Teacher with 5 years of experience. Our Expertise, is reliable to meet your full Academic development needs . Worked on many crafts and construction projects offering services from design to development to deployment over the years. You will find many of my works in my business portfolio on request.