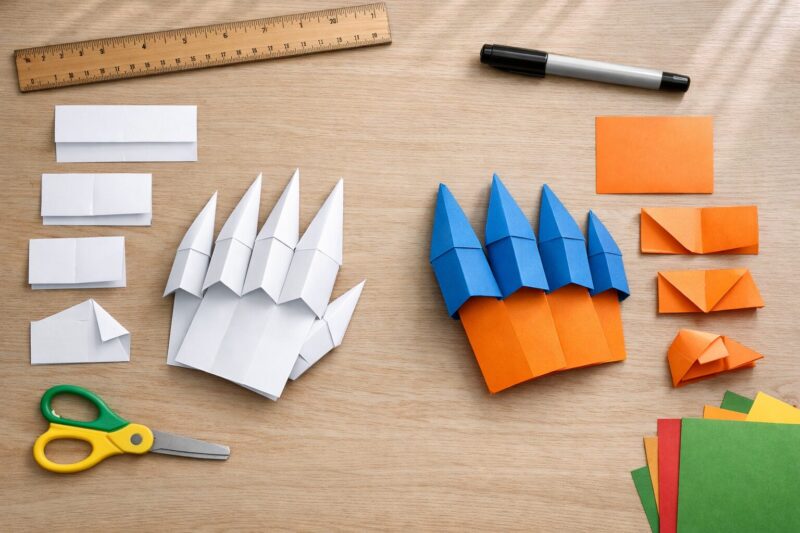

If you want to learn how to make paper claws 2 methods, the easiest path is to start with a basic rectangular paper claw and then try a sturdier origami-style version. The first method is faster and better for beginners, while the second method looks cleaner and holds its shape better for costumes or play.
Key Takeaways
- You can make paper claws with printer paper or origami paper.
- Method 1 is the classic fast claw made from a rectangle.
- Method 2 is a sturdier folded claw that usually looks sharper.
- Most people finish one claw in a few minutes, then repeat it for all fingers.
- Choose thin paper for easier folding and slightly thicker paper for stronger claws.
- The most common mistakes are crooked folds, loose tips, and making the finger pocket too small.
- Kids can do this craft with supervision, especially if scissors are used to resize paper.
- Paper claws are best for pretend play, costumes, classroom crafts, and rainy-day projects.
What do you need before making paper claws?
You only need paper and a flat surface to make paper claws. A ruler and scissors can help, but the classic method often works with plain paper and careful folding alone.
Before I start, I like to set up a simple craft space so the folds stay clean.
Basic materials:
- 1 sheet of paper per claw
- Flat table or desk
- Optional: scissors
- Optional: ruler for sharper creases
- Optional: colored paper for a costume look
Best paper choices:
| Paper type | Best for | Notes |
|---|---|---|
| Printer paper | Beginners | Easy to find and easy to fold |
| Origami paper | Cleaner folds | Good for method 2 |
| Construction paper | Bigger claws | Can be harder to crease neatly |
| Recycled notebook paper | Practice | Fine for testing size |
Choose this paper if…
- Choose printer paper if you want the easiest start.
- Choose origami paper if you want cleaner, sharper claws.
- Avoid very thick cardstock because the folds can get bulky.
Common mistake:
Using paper that is too thick often makes the tip puff out instead of forming a sharp claw.
How to make paper claws 2 methods for beginners
The easiest way to understand how to make paper claws 2 methods is to learn the quick classic version first, then move to the sturdier folded version. That order helps because the first method teaches the finger pocket and tip shape.

Here’s the basic difference:
- Method 1: Fast, simple, classic finger claws
- Method 2: Stronger, neater, better for a finished look
“If you’re making ten claws for both hands, speed matters. Start with the fast version, then upgrade your favorite fingers with the sturdier one.”
Who this is for:
- Kids doing a simple paper craft
- Parents helping with a costume activity
- Teachers leading an easy classroom project
- Anyone making pretend monster, wolf, or dinosaur claws
Who may want something else:
- If you need claws that last all day, paper may be too flimsy.
- If you want realistic cosplay props, foam or craft plastic may work better.
How do you make the classic fast paper claw method?
The classic method is the fastest answer to how to make paper claws 2 methods. You fold a rectangular sheet into a pointed cone-like finger claw with a pocket at the bottom.
Method 1: Classic rectangular paper claw
- Start with a rectangle.
Use printer paper or half a sheet if you want a smaller claw. - Fold one corner across to make a triangle.
Press the crease well. - Fold the triangle again so the shape gets narrower.
Keep the point lined up. - Wrap one side inward toward the center.
This begins the cone shape. - Wrap the other side over it tightly.
You should now see a pointed claw form. - Tuck the loose flap into the pocket.
This locks the claw together. - Slide your finger into the open end.
Adjust gently so it fits without tearing.

Quick checks for a good result
- The tip should look sharp, not flat.
- The base should be open enough for one finger.
- The tucked flap should hold without springing open.
Choose this method if…
- You want the fastest result
- You are making a full set for both hands
- You are teaching younger kids
Common mistake:
If the claw opens up, the final flap probably was not tucked deep enough. Refold the outer layer tighter, then tuck again.
Mini example:
If a claw feels too big on your pinky finger, start with a smaller rectangle instead of trying to squeeze the fold tighter at the end.
How do you make the sturdier origami-style paper claw method?
The sturdier method takes a bit longer, but it usually holds its shape better. It works best when you want cleaner points and a more uniform set of claws.
Method 2: Sturdier origami-style claw
- Start with a square sheet of paper.
If you only have printer paper, trim it into a square. - Fold the square diagonally into a triangle.
Crease firmly. - Fold one corner toward the top point to create a layered shape.
Keep edges aligned. - Fold the opposite corner inward so both sides overlap near the center.
- Refold the whole shape lengthwise to make the claw narrow and pointed.
- Create the finger pocket by opening the wider end slightly.
- Tuck any loose flap inside to lock the shape.
Why some people prefer this method
- The claw often looks sharper and more even
- The layers can make it stiffer
- The shape tends to stay in place better during play
Choose this method if…
- You want a better-looking costume accessory
- You have origami paper
- You don’t mind spending more time per claw
Edge case:
If your square paper is very small, the final finger pocket may not fit. Use a larger square for thumbs or adult fingers.
Which paper claw method should you choose?
Choose the classic method if you care about speed, and choose the sturdier method if you care about shape and durability. For most beginners, that simple rule works well.
Fast comparison
| Feature | Method 1: Classic | Method 2: Sturdier |
|---|---|---|
| Difficulty | Easy | Easy to medium |
| Speed | Faster | Slower |
| Look | Simple | Cleaner |
| Strength | Fair | Better |
| Best paper | Printer paper | Origami or thin paper |
| Best for | Kids, quick crafts | Costumes, neat sets |
My rule of thumb:
If I’m making a full set in one sitting, I use Method 1 first. If I want claws that match and look better in photos, I use Method 2.
What are the most common mistakes when making paper claws?
Most paper claw problems come from loose folds, wrong paper size, or uneven creases. The fix is usually simple: refold more tightly, resize the paper, or remake the claw with cleaner edges.
Common problems and fixes
The claw is too loose
- Use a smaller paper piece
- Fold tighter before tucking the flap
- Press each crease with a fingernail or ruler edge
The tip looks blunt
- Align the corners more carefully
- Refold the point before locking the shape
- Avoid thick paper
The claw won’t fit your finger
- Start with a larger sheet
- Make the final pocket wider
- Test size after a practice claw
The claw tears
- Don’t force your finger inside
- Use fresh paper without old fold lines
- Open the base slowly
The claw falls apart
- Tuck the flap deeper
- Add a tiny piece of tape if needed for classroom crafts
Common mistake:
People often make all ten claws before testing one. Make one claw first, check the fit, then repeat.
How long does it take and how much does it cost?
Paper claws are fast and very cheap to make. If you already have paper at home, the cost can be almost nothing, and the time per claw is usually short once you learn the folds.
Typical time and cost
- One beginner claw: a few minutes
- A full set of 10: often under an hour with practice
- Cost: usually just the cost of paper
Good uses for paper claws
- Costume extras
- Halloween craft time
- School art activities
- Imaginative play
- DIY photo props
Not ideal for
- Rough outdoor play
- Long events in wet weather
- Very small children who may crumple or chew paper props
Can you customize paper claws for costumes or play?
Yes, paper claws are easy to customize with color, size, and finish. The best customization depends on whether you want playful claws, scary claws, or matching costume accessories.
Easy ways to customize
- Use black, red, silver, or patterned paper
- Make longer claws with larger sheets
- Draw lines or cracks with marker
- Add a tiny bit of tape inside for strength
- Match each hand with different colors for a creature effect
Quick example ideas
- Wolf claws: gray paper with black tips
- Monster claws: green paper with jagged marker lines
- Dragon claws: red paper with gold accents
- Ice claws: white or pale blue paper
Decision rule:
Choose plain white paper for practice. Switch to colored paper only after you know the folds.
FAQ
Can kids make paper claws?
Yes, many kids can make paper claws with guidance, especially using the classic method and lightweight paper.
Do I need origami paper?
No, origami paper helps, but regular printer paper works well for most paper claws.
Which method is easier?
The classic rectangular method is easier because it uses fewer precise folds.
Which method is stronger?
The sturdier origami-style method is usually stronger because it has more layered folds.
Can I make paper claws without scissors?
Yes, if you use a rectangular sheet for Method 1, you may not need scissors at all.
How many sheets do I need for 10 claws?
You need 10 paper pieces, one for each finger claw.
Why does my paper claw keep unfolding?
A paper claw usually unfolds because the final flap is not tucked tightly enough or the folds are too loose.
Can adults wear paper claws too?
Yes, adults can wear paper claws, but they may need larger paper to fit comfortably.
Are paper claws safe?
Paper claws are generally safer than hard costume props, but the tips can still poke, so use them gently.
Can I use tape or glue?
Yes, a small piece of tape can help if you want the claw to last longer.
Conclusion
Now you know how to make paper claws 2 methods, and the best choice depends on what you need. If you want quick results, use the classic rectangular method. If you want a neater, sturdier claw, use the origami-style method.
My advice is simple: make one test claw first, check the fit on your finger, and then finish the full set. Start with printer paper, focus on tight folds, and switch to colored paper once you like the shape. If you’re making claws for a costume, try Method 2 for the fingers that will show the most.
Next steps
- Make one classic claw right now
- Test the size on different fingers
- Try the sturdier version after that
- Create a full matching set for both hands

A Teacher with 5 years of experience. Our Expertise, is reliable to meet your full Academic development needs . Worked on many crafts and construction projects offering services from design to development to deployment over the years. You will find many of my works in my business portfolio on request.