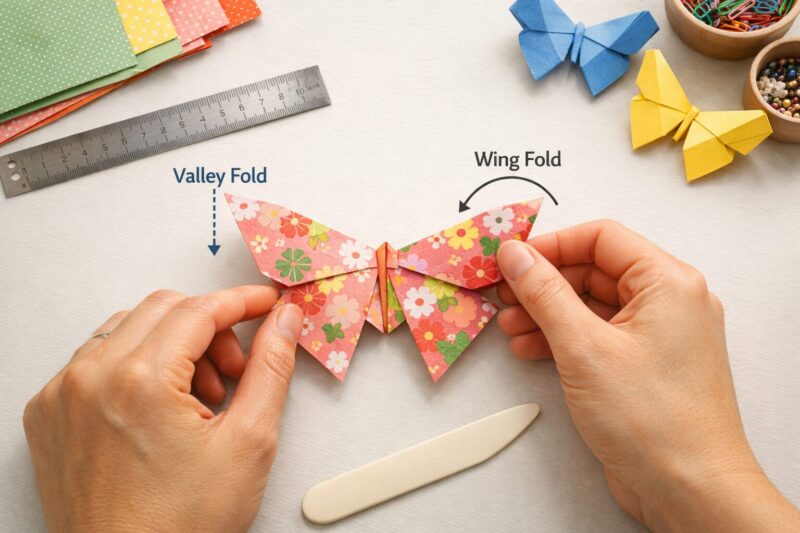

An origami butterfly step by step tutorial is a simple paper-folding guide that turns one square sheet of paper into a butterfly shape using a few basic folds. For most beginners, the easiest route is to use lightweight square origami paper, make sharp creases, and follow the folds in order without rushing. 🦋
Key Takeaways
- An origami butterfly is a beginner-friendly project if you start with a true square sheet.
- Lightweight paper is easier to fold than thick cardstock.
- Sharp, centered creases matter more than fancy paper.
- Most people can finish a simple butterfly in about 5 to 15 minutes, depending on experience.
- Choose 6 x 6 inch origami paper if you want an easy first attempt.
- Uneven wings usually happen because the first diagonal folds were off-center.
- You can use origami butterflies for cards, wall art, mobiles, and gift wrapping.
- A good origami butterfly step by step tutorial works best when you fold slowly and flatten every crease before moving on.
What is an origami butterfly step by step tutorial?
An origami butterfly step by step tutorial is a folding guide that shows you exactly how to make a butterfly from paper, one fold at a time. It is best for beginners, kids with supervision, teachers, and crafters who want a quick project with a pretty result.
Origami butterflies are popular because they are:
- Easy to learn
- Low-cost
- Fast to make
- Useful for decoration
- Good practice for basic origami skills
A simple origami butterfly teaches three core skills at once: folding on center, keeping symmetry, and shaping a finished model cleanly.
If you are brand new to paper folding, this project is a smart place to start because the final shape looks impressive without requiring advanced techniques.
What do you need before you start?
You only need a few supplies to make a paper butterfly. The best setup for beginners is one square sheet of thin origami paper and a flat table.
Basic materials
- 1 square sheet of origami paper
- A clean, flat surface
- Optional: ruler, pencil, bone folder, glue dot for display
Choose the right paper
Use thin paper if you are learning. Thick paper fights back and makes wing shaping harder.
| Paper type | Best for | Pros | Cons |
|---|---|---|---|
| Origami paper | Beginners | Easy to crease, light, affordable | Can tear if overworked |
| Printer paper cut into a square | Practice | Easy to find | Less crisp finish |
| Washi paper | Decorative models | Pretty texture and color | Can be harder for first tries |
| Cardstock | Display only | Holds shape well | Too thick for most beginners |
Choose origami paper if you want the easiest first result.
Choose printer paper if you just want to practice the sequence before using nicer paper.
Common mistake
A lot of folding problems start before the first fold. If the paper is not a perfect square, the wings will not match.
How do you make an origami butterfly step by step?
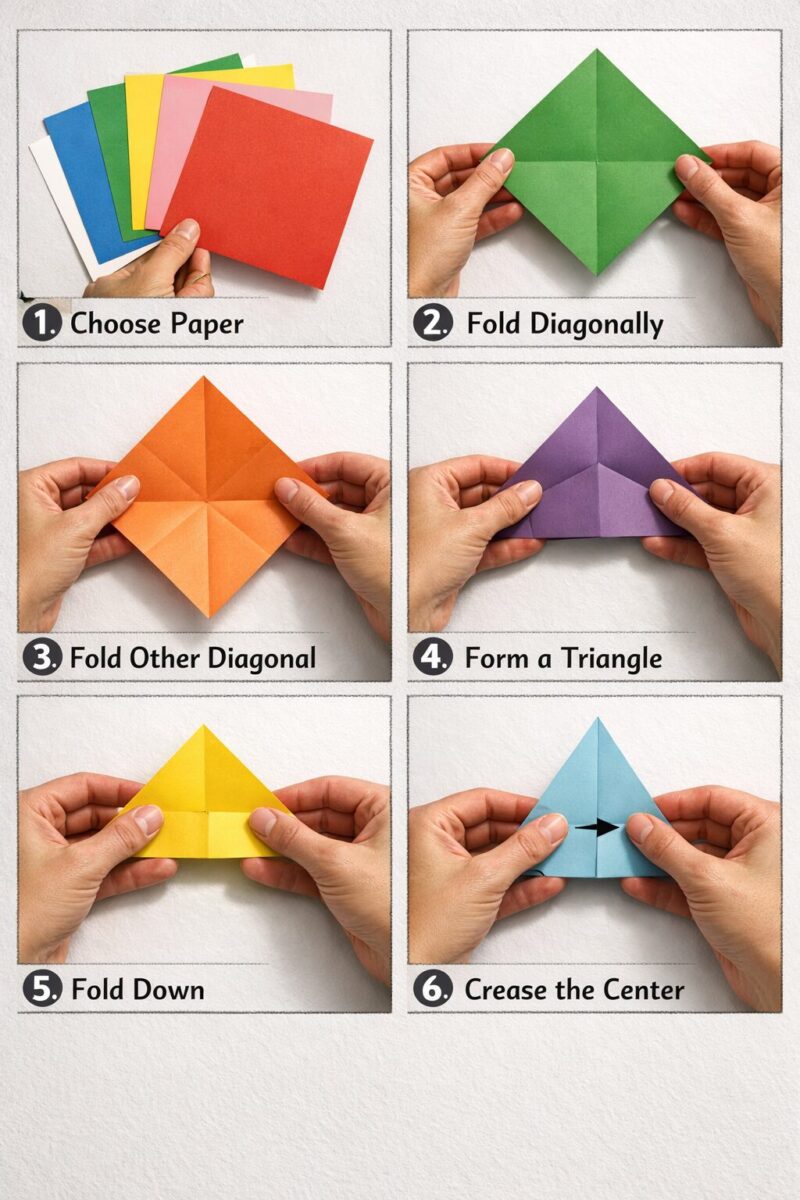
To make an origami butterfly, fold a square sheet diagonally both ways, collapse it into a triangle base, shape the wings, then fold and pinch the center so the butterfly opens evenly. The exact sequence can vary by design, but the beginner method below is simple and reliable.
Origami butterfly step by step tutorial for beginners
- Start with a square sheet
Place the paper colored side down if it has one. - Fold diagonally in half
Make a triangle, then open it. - Fold along the other diagonal
Make the second triangle, then open it again. - Fold the paper in half horizontally
Crease and open. - Fold the paper in half vertically
Crease and open. - Collapse into a triangle base
Push the sides inward using the creases you made. The paper should flatten into a smaller triangle. - Position the triangle with the open end facing down
Keep the long folded edge at the top. - Fold one top layer upward slightly past the top edge
This creates the upper wing shape. Flip and repeat if your design calls for it. - Fold the model in half vertically
This forms the butterfly body. - Pull the wings open gently
Adjust both sides until they look balanced. - Pinch the center crease
This helps the body hold its shape. - Flatten lightly and style the wings
Curve them a little with your fingers if you want a softer look.
Quick checklist
- Is the paper square?
- Are the center creases straight?
- Did the triangle base collapse neatly?
- Do both wings match?
- Did you press each fold before moving on?
Quick example
If one wing looks larger, go back to the earliest diagonal creases. Small errors at the start become big shape problems at the end.
How long does an origami butterfly take, and who is it for?
Most beginners can make a simple origami butterfly in 5 to 15 minutes. This project is a good fit for older kids, adults, classrooms, party crafts, and quick home decor projects.
Good for
- Beginners
- Parents doing crafts with kids
- Teachers
- DIY decorators
- Card makers
- Gift wrapping projects
Not ideal for
- Very young children without help
- People using thick paper
- Anyone expecting a highly realistic butterfly on the first try
Decision rule:
Choose a simple butterfly pattern if you want quick success. Choose a more detailed model only after you can make even wings consistently.
What are the most common mistakes in an origami butterfly step by step tutorial?
The most common mistakes are uneven creases, paper that is too thick, and rushing through the base folds. Most failed butterflies can be fixed by restarting with lighter paper and taking extra care on the first four folds.
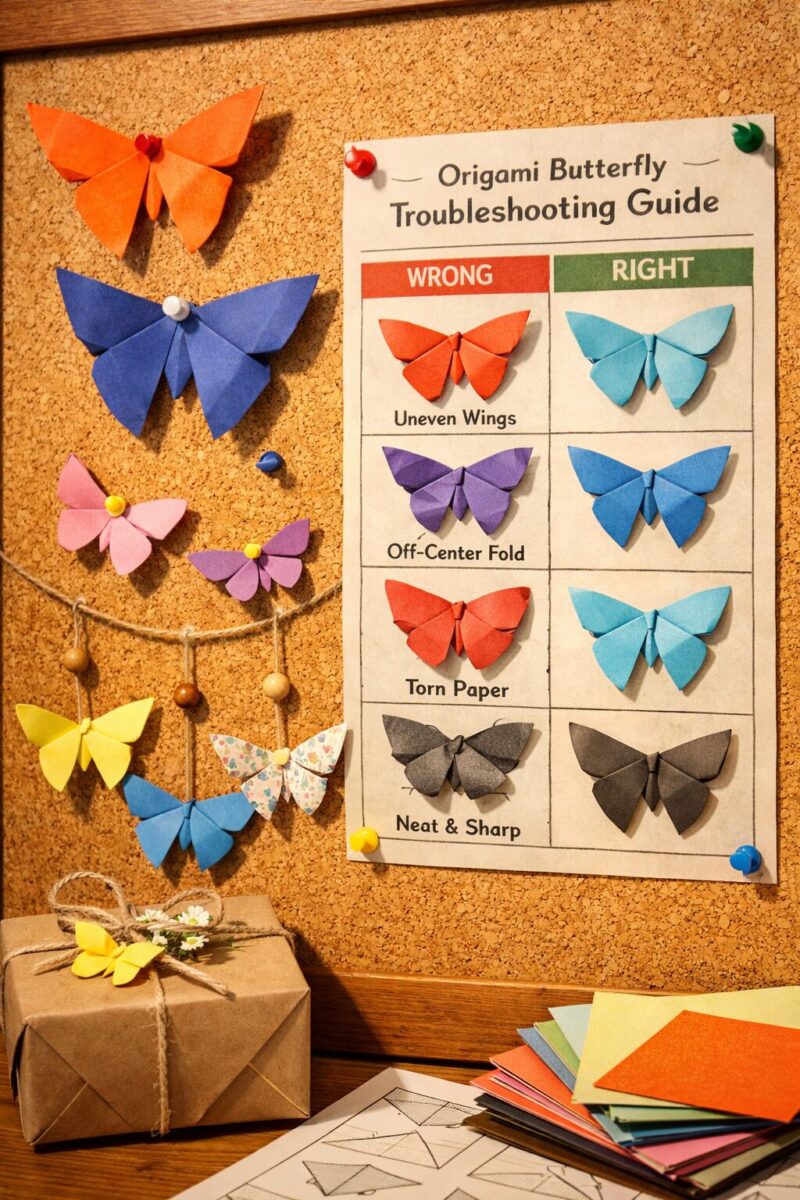
Common problems and fixes
1. The wings are uneven
Cause: The paper was not square or the first diagonal crease was off-center.
Fix: Start over with a perfect square and align corners carefully.
2. The paper tears
Cause: Too much refolding or paper that is too thin and worn out.
Fix: Use a fresh sheet and avoid reopening folds more than needed.
3. The butterfly will not stay open
Cause: Weak center crease.
Fix: Pinch the body line firmly and shape the wings outward gently.
4. The folds look bulky
Cause: Paper is too thick.
Fix: Use standard origami paper instead of cardstock.
5. The shape looks flat
Cause: No wing shaping at the end.
Fix: Curl or lift the wings slightly with your fingers for dimension.
Edge case
If you are using patterned paper, check the print direction before folding. Some patterns end up upside down on one wing depending on the design.
Which paper and butterfly style should you choose?
The best paper and style depend on your goal. Use plain origami paper for learning, patterned paper for decoration, and small squares for card embellishments.
Choose by purpose
- For practice: plain single-color origami paper
- For wall decor: patterned paper with strong contrast
- For greeting cards: mini butterflies from smaller squares
- For party decor: bright colors in matching sets
- For mobiles: lightweight paper so they hang well
Choose by size
- 6 x 6 inch: easiest for beginners
- 4 x 4 inch: good for small decorations
- 8 x 8 inch or larger: useful if you want larger display pieces
Pros and cons of simple vs detailed butterfly designs
Simple butterfly
- Faster
- Easier to teach
- Better for beginners
- Less realistic
Detailed butterfly
- More decorative
- Better for experienced folders
- Slower to complete
- More sensitive to folding mistakes
How can you use an origami butterfly after making it?
An origami butterfly can be used as decor, gift wrap detail, classroom art, or part of a larger paper craft project. Finished butterflies work best when attached lightly with tape dots, glue dots, or thread.
Fun ways to use them
- Tape them on a wall in a cluster
- Add them to handmade cards
- String them into a mobile
- Decorate a gift box
- Use them in scrapbook pages
- Make table decor for spring events
Mini idea block
Easy room decor idea:
Make 12 butterflies in two or three matching colors, then place them on a wall in a loose upward curve. It creates movement without needing a big budget.
How do you get better results with an origami butterfly step by step tutorial?
You get better results by slowing down, aligning corners carefully, and making each crease sharp before the next fold. Most origami improvement comes from precision, not speed.
Simple tips that help
- Fold on a hard, flat surface
- Press from the center outward for cleaner creases
- Rotate the model as needed so folds stay comfortable
- Practice once with cheap paper before using decorative sheets
- Compare both sides after every major fold
If you keep struggling
Try these in order:
- Use larger paper
- Use thinner paper
- Follow fewer folds at a time
- Restart instead of forcing a bad crease
- Make two or three in a row to build muscle memory
FAQ
Is an origami butterfly easy for beginners?
Yes. A simple origami butterfly is one of the easier decorative models for beginners.
What size paper is best for an origami butterfly?
A 6 x 6 inch square is usually the easiest size for a first attempt.
Can I use normal printer paper?
Yes. Cut printer paper into a perfect square first, but expect a slightly stiffer fold.
Why are my butterfly wings uneven?
Uneven wings usually come from off-center early creases or paper that was not cut square.
How long does it take to make one origami butterfly?
A simple version usually takes 5 to 15 minutes for most beginners.
Can kids make origami butterflies?
Yes, older kids can usually make simple origami butterflies with guidance and patience.
Do I need glue for origami butterflies?
No. Traditional origami uses folds only, though glue can help for display purposes.
What is the best paper for an origami butterfly step by step tutorial?
Thin origami paper is best because it folds cleanly and holds shape without too much bulk.
Can I hang origami butterflies from the ceiling?
Yes. Use thread or clear fishing line and lightweight paper for the best effect.
How do I make the butterfly look more realistic?
Use patterned paper, shape the wings gently, and make the center crease crisp so the body stands out.
Conclusion
An origami butterfly step by step tutorial does not need to be complicated to work well. Start with square, lightweight paper, focus on clean creases, and follow the folds in order. If the first butterfly looks a little uneven, that is normal. The second and third usually look much better.
If you want a simple next step, do this:
- Make one butterfly with plain paper
- Make a second one with patterned paper
- Create a small set of three to five for decor or cards
That is the fastest way to build confidence and get a result you will actually want to display.

A Teacher with 5 years of experience. Our Expertise, is reliable to meet your full Academic development needs . Worked on many crafts and construction projects offering services from design to development to deployment over the years. You will find many of my works in my business portfolio on request.